Aerospike Connect for Trino
With Aerospike Connect for Trino (also referred to as the Trino connector), you can:
- Run ANSI SQL queries to perform in-place, on-demand analytics on massive amounts of data in Aerospike databases.
- Federate queries across multiple Aerospike clusters.
- Integrate Aerospike into an ecosystem of multiple data-storage technologies.
- Query Aerospike by using business-intelligence (BI) tools, such as Tableau.
- Query records with different schemas within the same set in Aerospike.
- Accelerate queries by using Aerospike's massive parallelism, predicate pushdown, and secondary indexes.
- Leverage Trino's Cost-Based Optimization via row count for query optimization.
- Deploy in a cloud or Kubernetes environment if you want to leverage Managed Trino Services offered by cloud providers.
Aerospike Connect for Trino supports the Trino (formerly PrestoSQL) SQL query engine.
System Topology
The following diagrams provide a high-level overview of how client applications, Trino, and Aerospike Database interact:
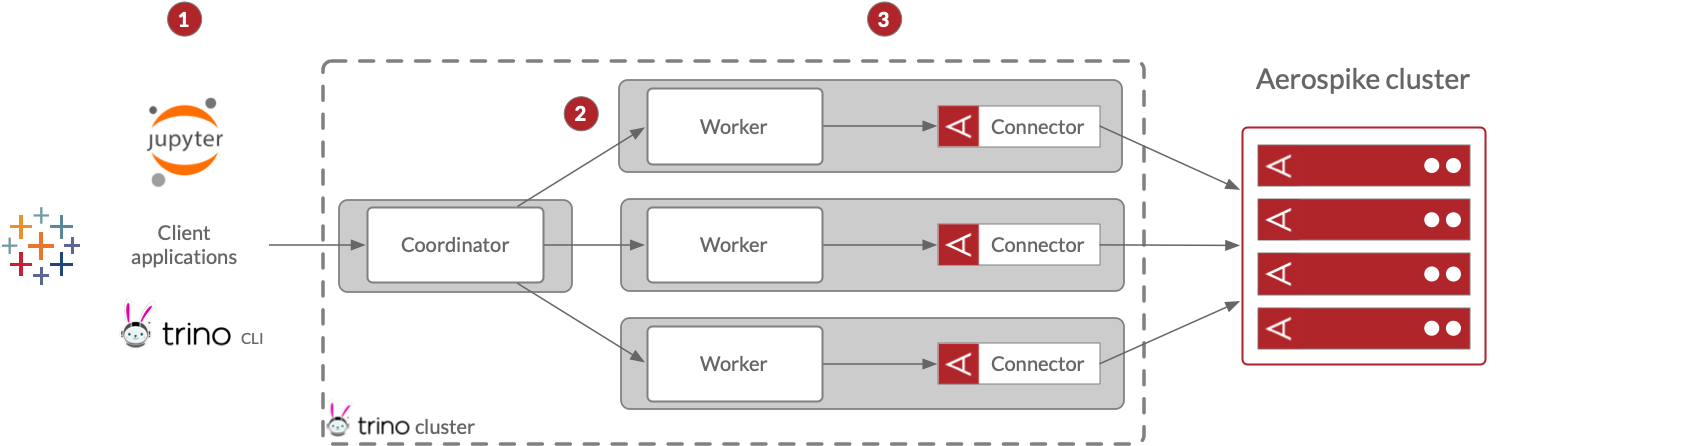
- A client application, such as Jupyter, Tableau, or the Trino CLI, passes an SQL query to the Trino coordinator.
- The Trino coordinator constructs a query plan and distributes portions of the plan among workers.
- The connectors send parallel partition scan requests and push down predicates wherever possible to the Aerospike database as a part of the data load stage of query execution.
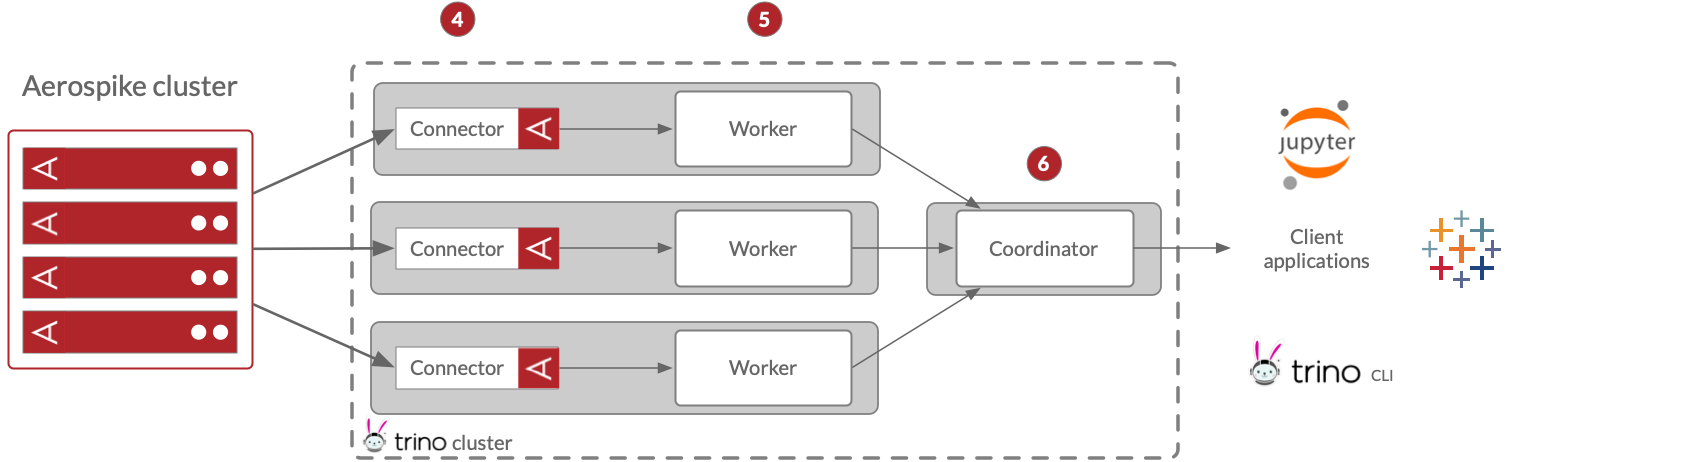
- The Trino connector loads the scanned data from the 4,096 Aerospike partitions into the configured number of Trino splits.
- The Trino workers process the splits and execute the remaining stages to generate the result set.
- The coordinator fetches results from the workers and returns them to the client application.
Secondary Indexes
The Aerospike Trino connector now supports secondary index. Creating a secondary index (sindex) on a high-cardinality bin in a set can help significantly speed up your Trino queries. If you know the sindex cardinality, you can provide the sindex to be used for your query as a hint using the sindex_name session property. The '__sindex' table provides the details on available sindexes and is created for each schema. You can change its name using the aerospike.index-table-name configuration property. See the examples section for step by step instructions on how to query using secondary index.
Limitations
- Support for Trino Cost-Based Optimization is limited to statistics for a table, i.e. row count.
- Trino ignores case types in table names. Therefore, ensure two sets within the same namespace in Aerospike database do not have the same name that differ in case types, e.g. sets named "deepLearning" and "deeplearning", to prevent name collision in Trino. Similarly, ensure that two bins within the same set do not have the same name that differ in case types.
- Trino does not support a sindex query on CDTs.
- Use caution when working with user keys returned by the
__digestquery. When you query with__digest, user keys stored in the database may be returned as NULL values in the result set. This is a known issue.
Getting started
You can follow these instructions to deploy the Trino connector and a Trino cluster: