Install Aerospike SQL Powered by Starburst
Aerospike SQL Powered by Starburst provides a tightly-integrated SQL processing engine to the Aerospike Real-time Data Platform. Powered by Starburst Enterprise, Aerospike SQL provides an enterprise-grade implementation of the open source Trino (formerly PrestoSQL) that is installed, managed and supported by Aerospike.
The combination of the Aerospike Database and the Starburst SQL engine offers a rapid and cost effective way for SQL users to generate valuable insights in dashboards, ad-hoc queries, or Python applications.
Aerospike SQL runs Trino on a single machine, a cluster of machines, on-prem, or in the cloud. Aerospike SQL uses the Aerospike Trino connector to reconcile the data model differences which manifest when accessing a NoSQL database such as Aerospike (ASDB) using SQL via an SQL engine, such as Trino.
Overview
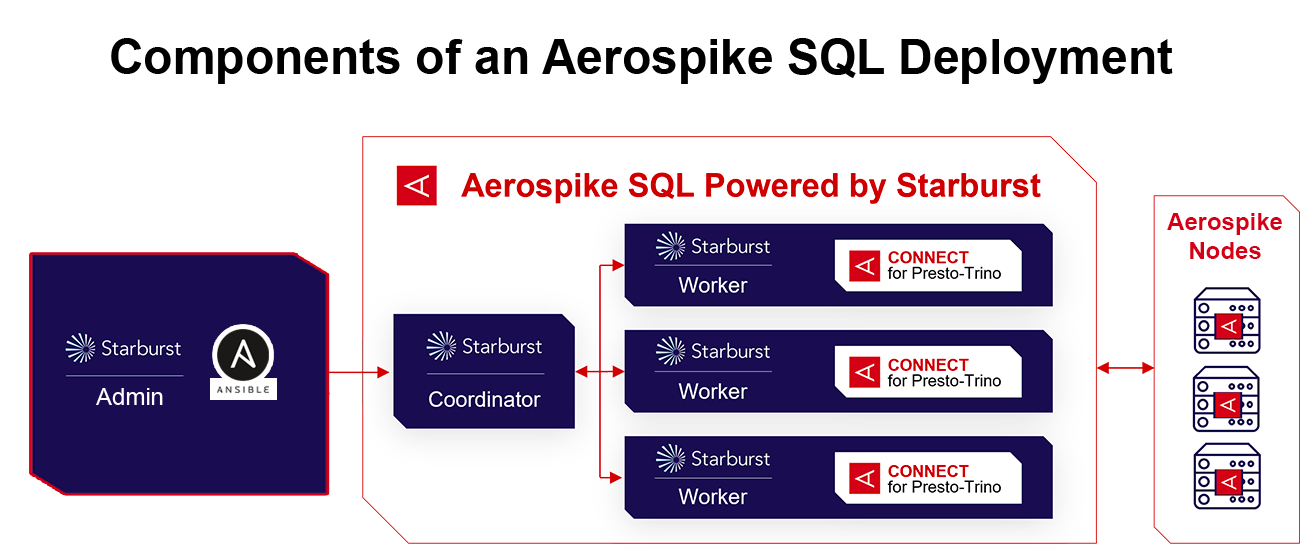
A deployment of Aerospike SQL consists of four components.
- Starburst Admin: This is a collection of Ansible playbooks for installing and managing Starburst Enterprise platform (SEP) or Trino clusters.
- Starburst Coordinator node and Starburst Worker node(s): More information about these here.
- Aerospike Connect for Trino.
- Aerospike Database Cluster.
This image illustrates the architectural view. This guide walks you through the setup and configuration of this deployment.
Installing Aerospike SQL broadly consists of the following four steps:
- Install the Aerospike SQL package on Starburst Admin node.
- Install the following components using Ansible scripts in the
aerospike-sqlpackage:- Starburst Enterprise
- Aerospike Connect for Trino
- Place the license files.
- Start the deployment.
Prerequisites
- Aerospike cluster set up and running. See our install documentation for more information.
- Aerospike Enterprise Edition license key.
- Starburst Enterprise license key.
- Aerospike SQL package.
Aerospike SQL is supported on Debian, CentOS 7, and Red Hat Enterprise Linux (RHEL 8 and 9) with standard system utilities installed, including git, rpm, rsync, ssh, tar, wget, and zip/unzip.
Before you proceed, verify passwordless SSH connectivity between the Starburst Admin to Starburst coordinator and worker(s).
Some tips on installing and using ansible on RHEL 9:
dnf install -y ansible-core
ansible-galaxy collection install ansible.posix
yum install -y rsync
Run the .deb package without interactive dialogue.
DEBIAN_FRONTEND=noninteractive
Starburst Admin node requirements:
- Python3
- Java JDK 17
- Ansible
Starburst Coordinator and Worker node requirements:
- Python:
- CentOS 7, RHEL (8 and 9): Python3
- Debian: Python
- Java JDK 17
- jq command-line JSON processor
- unzip or zipinfo
Pre-Flight checklist
Go through the following table and ensure you meet each requirement. The installation process will fail if the requirements are not met.
| Location | Requirement |
|---|---|
| Starburst Admin node | |
| Python 3 | |
| Java JDK 17 | |
| Ansible | |
| Able to SSH without a password to and from the coordinator and worker nodes. | |
| Starburst Coordinator and Worker nodes | |
| Python 3 (If using CentOS 7/RHEL 8 and 9) Python (If using Debian) | |
| Java 17 | |
| jq command-line JSON processor | |
| unzip or zipinfo | |
| Aerospike nodes | Aerospike database version compatible with your Trino connector. See this page for details. |
1. Install the Aerospike SQL package
Download the Aerospike SQL package to the Starburst admin node.
- Install the Aerospike SQL package:
- CentOS 7 and RHEL :
sudo rpm -i aerospike-sql-1.3.0-1.noarch.rpm - Debian:
sudo dpkg --force-architecture -i aerospike-sql_1.3.0.noarch.deb
After the package is installed, update the configurations.
a. Go to the installed Aerospike SQL directory:
cd /opt/aerospike/aerospike-sqlb. Edit the following lines in the
playbooks/hostfile.[coordinator]
COORDINATOR_IP ansible_user=STARBURST_USER ansible_ssh_private_key_file=~/.ssh/id_rsa
[worker]
WORKER_1_IP_ADDRESS ansible_user=STARBURST_USER ansible_ssh_private_key_file=~/.ssh/id_rsa
# Add all the worker nodes as applicable
# WORKER_2_IP_ADDRESS ansible_user=STARBURST_USER ansible_ssh_private_key_file=~/.ssh/id_rsa
# WORKER_3_IP_ADDRESS ansible_user=STARBURST_USER ansible_ssh_private_key_file=~/.ssh/id_rsaReplace:
COORDINATOR_IPwith the private IP address of the Starburst coordinator node.WORKER_1_IP_ADDRESSwith the private IP address of the Starburst worker node(s).[starburst_user]with your Starburst Admin username.
c. Edit the following lines in the
files/catalog/aerospike.propertiesfile.connector.name=aerospike
# Replace with your public IP for all aerospike nodes in the cluster
aerospike.hostlist=AEROSPIKE_NODE_1_IP_ADDR:3000,AEROSPIKE_NODE_2_IP_ADDR:3000,AEROSPIKE_NODE_3_IP_ADDR:3000
aerospike.split-number=8
aerospike.strict-schemas=false
aerospike.record-key-hidden=false
aerospike.enable-statistics=true
aerospike.insert-require-key=true
#Change OS_USER as per your OS(eg: default user for CentOS/Fedora/RHEL on AWS is “ec2-user”)
aerospike.table-desc-dir=/home/OS_USER/
aerospike.clientpolicy.tls.enabled=false
aerospike.case-insensitive-identifiers=trueReplace:
AEROSPIKE_NODE_1_IP_ADDR,AEROSPIKE_NODE_2_IP_ADDR, andAEROSPIKE_NODE_3_IP_ADDRwith the public IP for the Aerospike nodes.OS_USERwith the default username for your OS.
2. Use Ansible to install components
In the next stage, use the Ansible playbooks from the Aerospike SQL package to install Starburst Enterprise and the Aerospike Trino connector.
- Install Starburst Enterprise with the following Ansible command on the Starburst admin node:
ansible-playbook playbooks/install.yml
This downloads and installs Starburst Enterprise and Starburst Trino. This process should take less than 10 minutes.
When the installation successfully completes, the tail of the output looks like:
…
PLAY RECAP *****************************************************************************
172.31.2.13                : ok=14   changed=4    unreachable=0    failed=0    skipped=15   rescued=0    ignored=0
172.31.5.45                : ok=14   changed=4    unreachable=0    failed=0    skipped=15   rescued=0    ignored=0
For more information refer to the Starburst Trino configuration guide.
- Use Ansible to Install the Aerospike Trino Connector
Run the following Ansible command on the Starburst admin node to install the Aerospike Trino Connector:
ansible-playbook playbooks/aerospike.yml
This downloads and installs the Aerospike Trino connector.
When the installation successfully completes, the tail of the output looks like:
PLAY RECAP *****************************************************************************
172.31.2.13                : ok=9    changed=3    unreachable=0    failed=0    skipped=1    rescued=0    ignored=0
172.31.5.45                : ok=9    changed=3    unreachable=0    failed=0    skipped=1    rescued=0    ignored=0
For more information, see the Aerospike Connector configuration guide
3. Place the license files
In this stage of the deployment, place the Starburst and Aerospike license files as specified.
- Starburst: Copy the Starburst license file (
starburstdata.license) to the/etc/starburstdirectory on the Starburst coordinator server.
Contact your Aerospike Sales Representative to get the Starburst license file.
- Aerospike EE: Follow the instructions in Providing the Feature-Key File to place the Aerospike Feature Key file on the Aerospike instance.
4. Start the Aerospike SQL deployment
a. Update the configurations
Use the following Ansible command on the Starburst admin node to generate the configuration file for the coordinator and workers, and distribute these files to all hosts:
ansible-playbook playbooks/push-configs.yml
When this process is complete, the final output is:
PLAY RECAP *****************************************************************************
172.31.2.13                : ok=25   changed=17   unreachable=0    failed=0    skipped=0    rescued=0    ignored=0
172.31.5.45                : ok=25   changed=17   unreachable=0    failed=0    skipped=0    rescued=0    ignored=0
b. Start Aerospike SQL
Use Ansible on the Starburst admin node to start the Aerospike SQL deployment:
ansible-playbook playbooks/start.yml
When this process is complete, the final output is:
PLAY RECAP *****************************************************************************
172.31.2.13                : ok=3    changed=1    unreachable=0    failed=0    skipped=1    rescued=0    ignored=0
172.31.5.45                : ok=3    changed=1    unreachable=0    failed=0    skipped=1    rescued=0    ignored=0
c. Verify the deployment on Coordinator
Use the following command to show the active Starburst process and verify it is running:
ps -ef | grep starburst
Expected output:
starbur+ 13120     1 34 05:30 ?        00:00:28 java -cp /usr/lib/starburst/lib/* -server -Xmx16G -XX:-UseBiasedLocking -XX:+UseG1GC -XX:G1HeapRegionSize=32M -XX:+ExplicitGCInvokesConcurrent -XX:+ExitOnOutOfMemoryError -XX:+HeapDumpOnOutOfMemoryError -XX:-OmitStackTraceInFastThrow -XX:ReservedCodeCacheSize=512M -XX:PerMethodRecompilationCutoff=10000 -XX:PerBytecodeRecompilationCutoff=10000 -Djdk.attach.allowAttachSelf=true -Djdk.nio.maxCachedBufferSize=2000000 -Dnode.launcher-log-file=/var/log/starburst/launcher.log -Dnode.environment=production -Dlog.enable-console=false -Dlog.levels-file=/etc/starburst/log.properties -Dlog.output-file=/var/log/starburst/server.log -Dnode.server-log-file=/var/log/starburst/server.log -Dcatalog.config-dir=/etc/starburst/catalog -Dconfig=/etc/starburst/config.properties -Dnode.data-dir=/var/lib/starburst -Dnode.id=1b176fe8-6f89-5bba-b826-df4bbdb4cf99 com.starburstdata.presto.StarburstTrinoServer
root     14054 13742  0 05:32 pts/0    00:00:00 grep --color=auto starburst
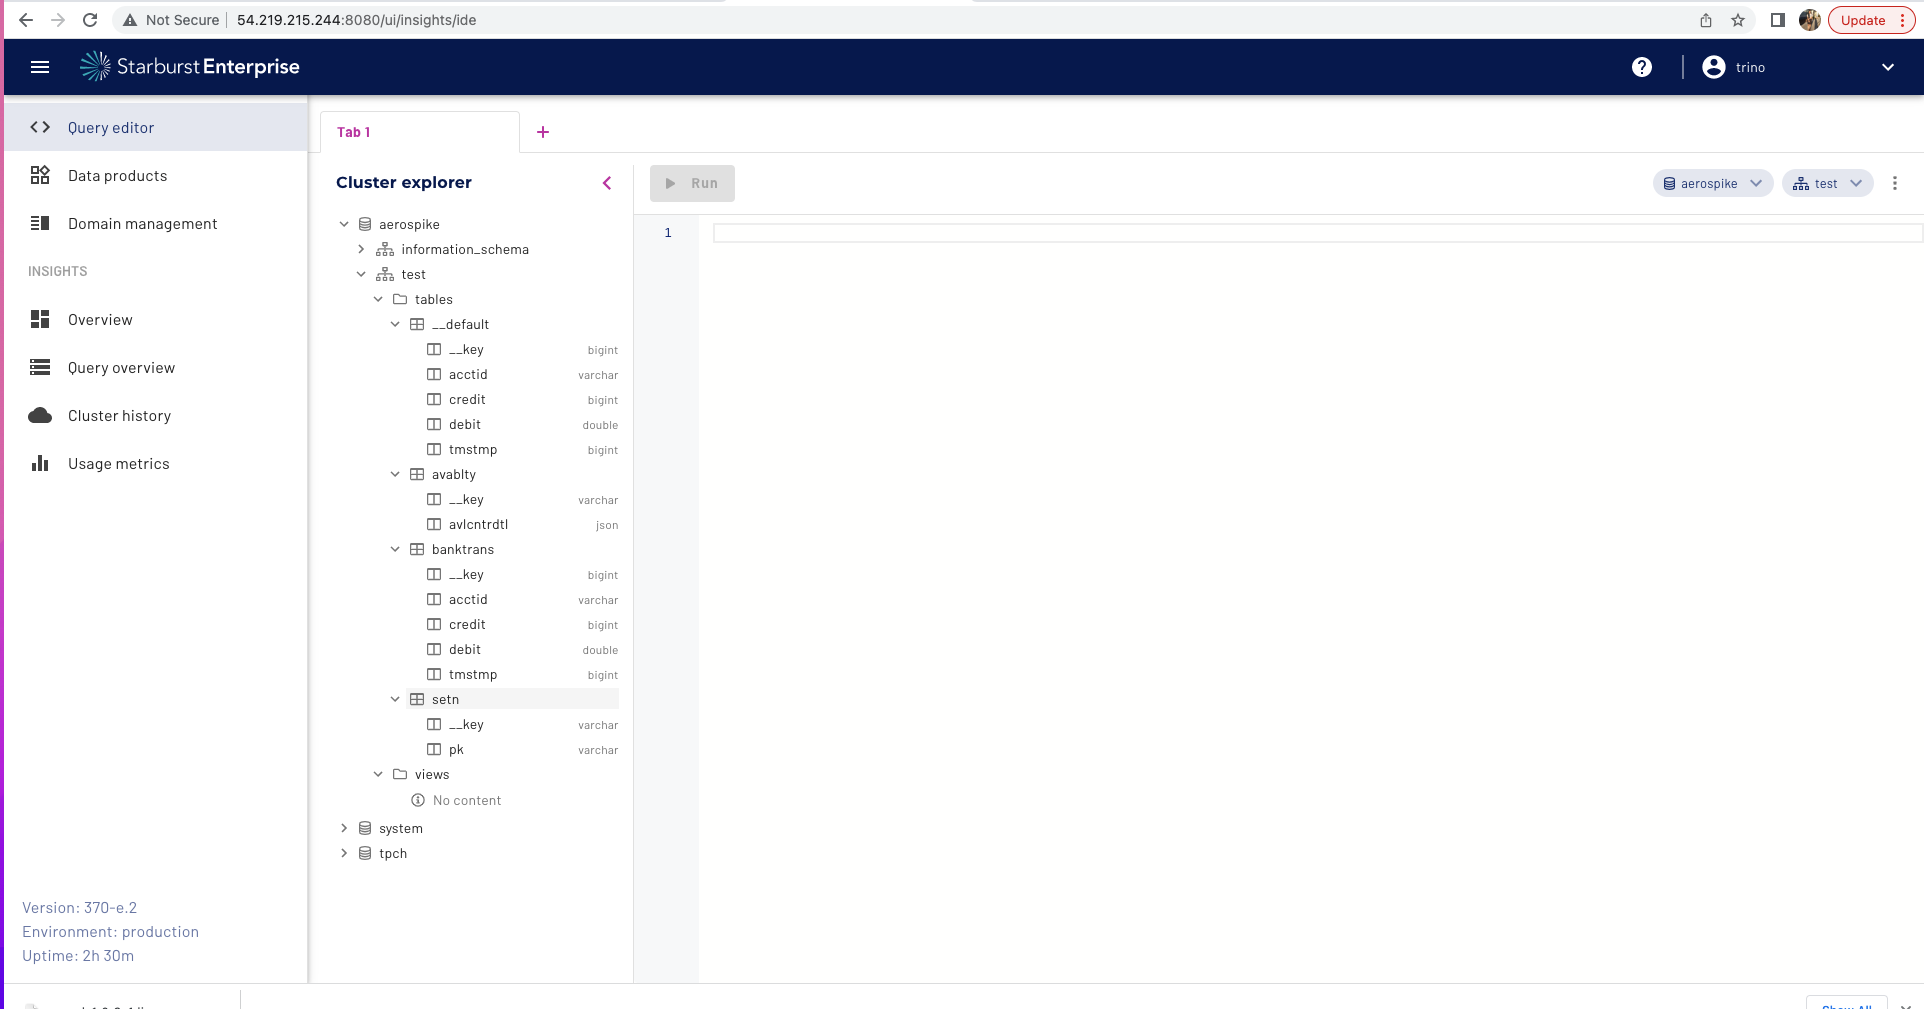
5. Visit the Aerospike SQL Query Editor Admin Panel
The Aerospike SQL Query Editor Admin Panel lets you view and edit your queries using a web browser.
Open a browser and go to the landing page: http://[coordinator's IP]:8080/ui/insights/ide
Create a user (
trinoin the example below), then use that user account to log in.

- Select Query editor.
Query editor:
Manage the deployment
You can issue the following Ansible commands from the Starburst admin node to manage the deployment.
Stop services:
ansible-playbook playbooks/stop.yml
Restart services:
ansible-playbook playbooks/restart.yml
Uninstall Starburst Enterprise:
ansible-playbook playbooks/uninstall.yml